For my final image, I have captured two different photographs, one of a bridge, and the second one of a roundabout at a childrens playground. I digitally manipulated the images, by cutting out the roundabout from the picture and pasting it onto the picture of the bridge, so that it looked like the roundabout is actually on the bridge.
To do this I used Photoshop, and I opened he two photos in two different tabs. I used the lasso tool to draw around the roundabout, and then used the tool with the picture of a circle in a square, and drew around the roundabout to make more accurate and neat. Next i clicked edit, cut, and then I pasted it onto the picture of the bridge. To make the photo look less cut and paste, I had to use the blur tool to smooth the edges of the roundabout, so it blended better with the background image.
Seung Woo Back has influenced me to do this piece of work, as he uses the same techniques within his photos, and his photography gave me ideas for my work.
I am pleased with my final digitally manipulated image, and how it looks. If i were to do it again, I would probably explore more whilst taking photographs, so I could used better things to put into the photo, and a better background.
Wednesday, 19 October 2011
Research: Seung Woo Back
Seung Woo Back is a Korean photographer, born in Taejon, Korea in 1973. His work consists of digitally manipulated images, which have famous buildings placed in different places of the world to where they actually are.
He attended 2 Universities which are the Chung Ang University in 2000, which is located in Seoul, Korea, where he studied Photography for two years, and he finished in 2002.
Afterwards, he went on to study Fine Art and Theory at Middlesex University, London, U.K, in 2005.
Seung Woo Back has severel collections which are; Portfolio foundation, Edinburg, England, U.K; Houston Museum of Fine Art, Houston, U.S.A; Santa Barbara, U.S.A; San Francisco Museum of Modern Art (SF MOMA), San Francisco, U.S.A; Michael G. Wilson collection, London, U.K; Art Gallery of New South Wales, Sidney, Australia.
Seung Woo Back's work is in comparison to my final piece of work, which is the Fantasy Landscape, by digitally manipulating an image. He takes parts from one image and pastes them onto another picture, like I did with mine. He places famous buildings and landmarks, such as the leaning tower of Pisa, The Eiffel Tower, Statue of Liberty, and many more, in a different place of the world. He makes them look realistic too, and it doesn't look like he has cut and paste, it looks like it could be a real place.


Research: Duane Michals
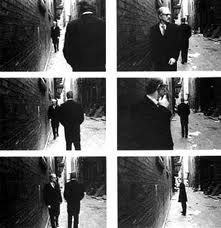
Duane Michals is an American photographer, born on 18th February 1932. He uses his photos in a sequence, often incorporating text to examine emotion and philosophy.
Michals began his artwork at the age of 14, whilst attending Watercolour University Classes at the Carnegie Institute, also known as Carnegie Museum of Art, located in Pittsburgh.
He received a B.A. from the University of Denver in 1953. He went into the Army for two years, when after, in 1956, he went on to study at the Parsons School of Design, with his plan to becoming a graphic designer, however he didn't succeed, and did not complete his studies.
Michals describes his photographic skills as "Completely self-taught." During a holiday in the USSR, in 1958, he discovered an interest in photography. The photographs he made during this trip became his first exhibition held in 1963 at The Underground Gallery in New York.
Duane Michals was a commercial photographer for several years, he worked for Esquire and Mademoiselle. He also covered the filming of The Great Gatsby for Vogue in 1974. He did not have a studio to work in, he took portraits of people in their environment instead, which was a contrast to the method of other photographers at the time, such as Avedon and Irving Penn.
The Government of Mexico hired Michals in 1968 to photograph the Olympics. His work was shown at The Museum of Modern Art in New York in 1970. The portraits he took between 1958 and 1988 later became the basis of his book, Album.
In 1976, Michals received a grant from the National Endowment for the Arts. Michals also produced the art for the album Synchronicity, by the Police, in 1983, and also the album Clouds Over Eden by Richard Barone, in 1993.
Some of Michals' photography has addressed gay themes, although he has not been involved in gay civil rights. Michals influences for his work are Balthus, William Blake, Lewis Carroll, Thomas Eakins, Rene Magritte, and Walt Whitman. He has also been an influence to others too, such as David Levinthal and Francesca Woodman.
He is noted for two innovations in artistic photography developed in the 1960s and 1970s. Firstly he told a story through a series of his photos, as in his book, Sequences, in 1970. Secondly, he hand wrote text near his photographs, thereby giving information that the image itself could not convey.
Duane Michals has received two awards, which are; A gold medal for photography at the National Arts Club, in 1994, and also the Masters Series Award, at the School of Visual Arts, in 2000.
Michals' work is a comparison to the first piece of work I did, which is a sequence of movement. I used several images, just like Michals did, and placed them all on the same page, so that you could see the different times of the movement.

Fantasy Landscape

Firstly I opened the image I wanted to cut and put onto another image.

I then opened the image I wanted to use as the background for the landscape.

I then drew around the part of the picture I wanted to cut out, with the lasso tool.

I then clicked the tool at the bottom on the left hand panel, which makes the rest of the picture red, leaving inside of the it I drew around the same

Afterwards, I drew around the part I wanted to cut out, more carefully and gettin closer to the edge of the roundabout.

This picture is after I carefully drew around it, and ready to cut out.

I then pasted the image onto the other image, so now the roundabout is on the bridge.

I then zoomed into the edges of the roundabout, and noticed the edges looked too rough, and it looked too fake.

So I used the blur tool to smooth the edges, to make it blend in with the photo better.

This is how the edge looks after using the blur tool.

This is the final image of my fantasy landscape after using the blur tool.
Tuesday, 4 October 2011
Adding a Border

Firstly, I chose them Image I wanted to add a border to.

Then, I clicked on the brush tool at the side and chose the size of the brush at the top.

Then I clicked on the box at the bottom left corner and changed the colour of the brush to black.

Then I clicked on layers and pressed the new layer option.

Then I looked at the opacity which was 100% and I changed it so it would blend better with the photo.

This is before I changed the opacity

I then changed the opacity to 71%

And this is the image after adding a border and changing the opacity.

I then changed the photo to balck and white, and I also changed the brightness and contrast.
This is the final image.
Wednesday, 28 September 2011
Layering 2 Images

Firstly, I chose the 2 photo's I wanted to use, from my folder, and had them as 2 seperate tabs.

I made sure Auto-Select and Show Transform Controls were ticked so this means I could rezise the photo I'm using to layer with the other photo.

I then dragged the photo over the other photo, so it was covering it completely, and then I resized the top layer so that it was the same size as the bottom layer.

This is how it looked when I resized the top layer.

Afterwards, I clicked on the arrow next to Normal, and changed it to Multiply.

Then I changed the opacity to 50% so that you could see both photos together in one.

This is the final photo after layering both images together.
Wednesday, 21 September 2011

Putting photo's onto one page

Firstly, I created a new page, by clicking new..
Then I changed the preset page to International paper, and the size should be A4.

Next, I clicked open, to open the photo I needed to put onto the page.

I chose the file I wanted to open, and clicked open, and it then opened in a new tab.

I then dragged the photo which I had opened onto the new page.

I made sure Auto-Select and Show Transform Controls were ticked, so then I could resize the photo.

Then I clicked view, show grid, so that I could see accurately how big the photo will be when I resize it.

Afterwards, I clicked Edit, Stroke.. which is to get a border for the photo.

Lastly, I chose the colour I wanted the border to be, and the thickness of it and pressed okay.

This is the final result, after I did the same to the other three photographs and put them all onto the same page, and I made the border the same on every picture, the red of the border matches the colour of the clothing in the picture.
Subscribe to:
Posts (Atom)